


Yule Log Cookies
- Cranberry Walk

- Dec 4, 2019
- 5 min read
Updated: Dec 11, 2019

I love the month of December and spend most of my time baking cookies. I go a little crazy, bake an enormous variety, and my kitchen ends up bursting at the seams. My husband and sons love coming home at the end of the day to see what I've whipped up; they're always happy to sample whatever is waiting for them. Yule Log Cookies is one of my favorites and have been baking them for too many years to count. Each time I make them, I'm flooded with Christmas memories of family and friends. It wouldn't be Christmas without them. Buttery, lemon-scented walnut dough is shaped into logs and then dipped in chocolate and sprinkles. With chocolate at either end, your assured deliciousness in every bite.
Ingredients for Yule Log Cookies:
yields approximately 70 cookies
2 cups all-purpose flour
2 sticks unsalted butter, room temperature
1 cup granulated sugar
3 ounces cream cheese, room temperature
1 egg yolk, room temperature
1 cup finely chopped walnuts
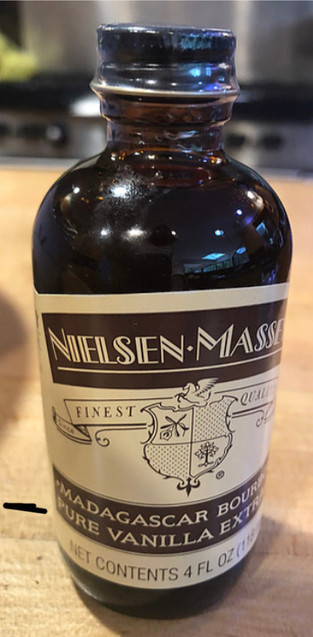
1 teaspoon vanilla
1/2 teaspoon lemon zest
1/2 teaspoon salt
8 ounces semi-sweet chocolate chips
10.5 ounces chocolate sprinkles
Time-Saving Tips: the cookies can be made in advance and frozen for a month. If freezing the cookies separate every single layer by wax paper.
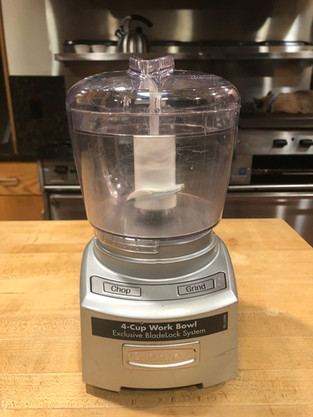
I use a mini Cuisinart to chop the nuts. I use the Cuisinart Mini-Prep with a four cup capacity bowl.
You will need an electric beater or a stand mixer. I am using the KitchenAid 5 Qt. Artisan Design Series Stand Mixer. Click HERE if you are interested in learning more about it.
You will also need two sheet pans. A few people have asked about which pans I use. Click HERE for more information.
Let's see what we need.


We're ready to bake.


Combine the butter, sugar, and cream cheese; beat until fluffy. Add the lemon zest, vanilla, and flour until combined; stir in the walnuts. Transfer the dough to plastic wrap and refrigerate a few hours or overnight before shaping the cookies.


Shape the dough into logs. I do this by dividing the dough into three sections. Even though I have a pastry board, I generally cover it with parchment paper while shaping the cookies. Working with one portion at time roll portions of it into a rope about 1/2" - 3/4 " and cut into logs. I make mine about 3 " long. Transfer the logs to parchment-lined sheet pans, about a 1 1/4 " apart.


Bake in a preheated 325-degree oven for 12-15 minutes until bottoms are golden. You will likely have to do this in batches, so please remember to put the dough on cool pans, or else the cookies will start to spread. Once out of the oven, transfer the cookies to a rack to cool.


Pour half of the chocolate chips in a small bowl. Since everyone's microwave is a little different start by cooking for 45 seconds. It will likely need a bit more time, but it is better to undercook and then need to cook a bit more than overcook the chocolate. The first picture is the chips right out of the bag; the second one shows what the chips look like after they cook. They might still look like chips, but they're likely melted enough. With a small spoon start stirring the chips, and they will all melt. If not, just microwave for a few more seconds. Don't overcook or else the chocolate will harden.

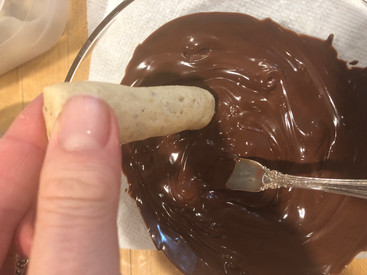

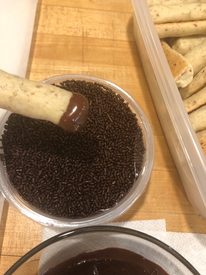


Set up a work station with the cookies, melted chocolate, sprinkles, and a parchment-lined service. Working reasonably quickly, dip one end of the log into the chocolate at a time and then in the sprinkles, let set on the parchment-lined surface. After a few hours, the chocolate will harden.
They're ready! Yule Log Cookies look great and taste even better. They look so pretty and festive on a cookie platter on their own or mixed with other kinds of cookies. These logs also make a great hostess gift when wrapped up in a decorate box.
Enjoy!
Yule Log Cookies:
yields approximately 70 cookies
2 cups all-purpose flour
2 sticks unsalted butter, room temperature
1 cup granulated sugar
3 ounces cream cheese, room temperature
1 egg yolk, room temperature
1 cup finely chopped walnuts
1 teaspoon vanilla
1/2 teaspoon lemon zest
1/2 teaspoon salt
8 ounces semi-sweet chocolate chips
10.5 ounces chocolate sprinkles
Combine the butter, sugar, and cream cheese; beat until fluffy. Add the lemon zest, vanilla, and flour until combined; stir in the walnuts. Transfer the dough to plastic wrap and refrigerate a few hours or overnight before shaping the cookies.
Shape the dough into logs. I do this by dividing the dough into three sections. Even though I have a pastry board, I generally cover it with parchment paper while shaping the cookies. Working with one portion at time roll portions of it into a rope about 1/2" - 3/4 " and cut into logs. I make mine about 3 " long. Transfer the logs to parchment-lined sheet pans, about a 1 1/4 " apart.
Bake in a preheated 325 -degree oven for 12-15 minutes until bottoms are golden. You will likely have to do this in batches, so please remember to put the dough on cool pans, or else the cookies will start to spread. Once out of the oven, transfer the cookies to a rack to cool.
Pour half of the chocolate chips in a small bowl. Since everyone's microwave is a little different start by cooking for 45 seconds. It will likely need a bit more time, but it is better to undercook and having to cook a bit more than overcook the chocolate. The first picture is the chips right out of the bag; the second one shows what the chips look like after they cook. They might still look like chips, but they're likely melted enough. With a small spoon start stirring the chips, and they will all melt. If not, just microwave for a few more seconds. Don't overcook or else the chocolate will harden.
Set up a work station with the cookies, melted chocolate, sprinkles, and a parchment-lined service. Working reasonably quickly, dip one end of the log into the chocolate at a time and then in the sprinkles, let set on the parchment-lined surface. After a few hours, the chocolate will harden.
Time-Saving Tips: the cookies can be made in advance and frozen for a month. If freezing the cookies separate every single layer by wax paper.
I use a mini Cuisinart to chop the nuts. I use the Cuisinart Mini-Prep with a four cup capacity bowl.
You will need an electric beater or a stand mixer. I am using the KitchenAid 5 Qt. Artisan Design Series Stand Mixer. Click HERE if you are interested in learning more about it.
You will also need two sheet pans. A few people have asked about which pans I use. Click HERE for more information.


Comments